Tuesday, April 21, 2009
Thursday, April 16, 2009
A fellow Ravelry sweetheart gratiously sent me the pattern to her darling little egg cosy's...and her permission to share the pattern on Ravelry for these cuties!

Well, after having spent the morning trying to upload a PDF file I have run into a dead-end (for now anyway)...so here, below, is the copy/pasted version of the pattern I told Corinne I'd post for her. I'll link this to Ravelry (she's funkynitter on Rav) and keep trying for the PDF version soon.
In the meantime, check out her Eggstremely Cosy Set on Ravelry and see text below for pattern:
Crochet Chicken Egg Cosy
Colour choices are total your choice but as an example I made the outside in a pastel colour and
the inside and body parts in a contrasting dark colour. Have fun adding any design of your choice
to the completed cosy.
Note: All parts are made in the round (spiral) without joining rows
Tools: 2.5 Crochet hook
Yarn: Any that works with hook size
Skills needed: Single crochet (sc), Double ‘magic’ ring
Comb (made up of three sections A, B, C)
Large (Make one) [A]
Round 1 : Make a double ring with 5 sc ( 5 sts)
Round 2 : sc twice in each sc (10 sts)
Round 3 - 5 : sc 10 sts (10 sts)
Round 6 : sc8, sc2tog ( 9 sts)
Round 7 : sc7, sc2tog ( 8 sts)
Round 8 : sc6, sc2tog ( 7 sts)
Round 9 : sc5, sc2tog ( 6 sts)
Break yarn and slip stitch to fasten off, tuck ends inside and flatten
Small (Make two) [B & C]
Round 1 : Make a double ring with 4 sc ( 4 sts)
Round 2 : sc twice in each sc ( 8 sts)
Round 3 - 4 : sc 8 sts ( 8 sts)
Round 5 : sc6, sc2tog ( 7 sts)
Round 6 : sc5, sc2tog ( 6 sts)
Page: 2 of 4
[B] - Break yarn and slip stitch to fasten off, tuck ends inside and flatten
[C] - Leave yarn attached and continue to make-up
To make-up:
Step 1: sc3 across one side of [C] (where yarn is still attached)
Step 2: Join [A] by sc3 across one side of [A]
Step 3: Join [B] by sc3 across one side of [B] and then sc3 on other side of [B]
Step 4: sc3 across other side of [A]
Step 5: sc3 across other side of [C]
Step 6: slip st along length to close and break yarn and slip stitch to fasten off
Beak
Top (Make one)
Round 1 : Make a double ring with 4 sc ( 4 sts)
Round 2 : sc twice in each sc ( 8 sts)
Round 3 : sc1 , sc2 in next st ( 12 sts)
Round 4 : sc12 ( 12 sts)
Fold in half and slip st along length to close, break yarn and slip stitch to fasten off
Bottom (Make one)
Round 1 : Make a double ring with 4 sc ( 4 sts)
Round 2 : sc twice in each sc ( 8 sts)
Round 3 : sc8 ( 8 sts)
Fold in half and slip st along length to close, break yarn and slip stitch to fasten off
Legs
Leg (Make two) Starting at toes end of leg
Round 1 : Make a double ring with 6 sc ( 6 sts)
Round 2 - 15: sc6 ( 6 sts)
(or until desired length) break yarn and slip stitch to fasten off
Toes (Make four)
Round 1 : Make a double ring with 6 sc ( 6 sts)
Round 2 - 3 : sc6 ( 6 sts)
Break yarn and slip stitch to fasten off
To make-up:
Sew 2 toes on each side of legs at about three rows up from end of leg so when you pinch the
toes and the end of leg together they are about the same length. If desired you can catch the two
toes so they stay pointing down.
Page: 3 of 4
Body (made up of two sections)
Outside (Make one)
Round 1 : Make a double ring with 4 sc ( 4 sts)
Round 2 : sc twice in each sc ( 8 sts)
Round 3 : sc all sts ( 8 sts)
Round 4 : (sc1, sc2 in next sc) 4 times ( 12 sts)
Round 5 : sc all sts ( 12 sts)
Round 6 : (sc2, sc2 in next sc) 4 times ( 16 sts)
Round 7 : sc all sts ( 16 sts)
Round 8 : (sc3, sc2 in next sc) 4 times ( 20 sts)
Round 9 : sc all sts ( 20 sts)
Round 10 : (sc4, sc2 in next sc) 4 times ( 24 sts)
Round 11 : sc all sts ( 24 sts)
Round 12 : (sc5, sc2 in next sc) 4 times ( 28 sts)
Round 13 : sc all sts ( 28 sts)
Round 14 : (sc6, sc2 in next sc) 4 times ( 32 sts)
Round 15 : sc all sts ( 32 sts)
Round 16 : (sc7, sc2 in next sc) 4 times ( 36 sts)
Round 17 : sc all sts ( 36 sts)
Round 18 : (sc8, sc2 in next sc) 4 times ( 40 sts)
Round 19 : sc all sts ( 40 sts)
Round 20 : (sc9, sc2 in next sc) 4 times ( 44 sts)
Round 21 : sc all sts ( 44 sts)
Round 22 : (sc10, sc2 in next sc) 4 times ( 48 sts)
Round 23 : sc all sts ( 48 sts)
Round 24 : (sc11, sc2 in next sc) 4 times ( 52 sts)
Round 25-34: sc all sts ( 52 sts)
Leave yarn attached
Inside (Make one)
Round 1 : Make a double ring with 4 sc ( 4 sts)
Round 2 : sc twice in each sc ( 8 sts)
Round 3 : (sc1, sc2 in next sc) 4 times ( 12 sts)
Round 4 : (sc2, sc2 in next sc) 4 times ( 16 sts)
Round 5 : (sc3, sc2 in next sc) 4 times ( 20 sts)
Round 6 : (sc3, sc2 in next sc) 5 times ( 25 sts)
Round 7 : (sc4, sc2 in next sc) 5 times ( 30 sts)
Round 8 : sc all sts ( 30 sts)
Round 9 : (sc4, sc2 in next sc) 6 times ( 36 sts)
Round 10 : sc all sts ( 36 sts)
Round 11 : (sc5, sc2 in next sc) 6 times ( 42 sts)
Round 12-18: sc all sts ( 42 sts)
Round 19 : (sc6, sc2 in next sc) 6 times ( 48 sts)
Round 20-24: sc all sts ( 48 sts)
Page: 4 of 4
Break yarn and slip stitch to fasten off. Turn inside out.
NOTE:
- Number of increase rounds can be adjusted to suit size of egg by trying fitting while in progress.
- Round 19 is to allow for cosy to fit over lip of egg cup, this may need to be moved up or down
depending on egg cup
- Outside is 4 sc wider than inside to ensure that it does not cause the inside to pucker up when
they are joined together
To make-up:
Note: While sewing on parts they can be secured by a couple of knots as they will be hidden
between body parts
Sew Comb on to top of Outside of body, front to back, bending over point
Sew on top beak curving down, approx 6 rows down from comb
Sew on bottom beak curving up close to top beak
Sew two beads on for eyes
Sew legs on about one round above bottom of body making sure the toes are level
Put a little stuffing inside point of head to prevent it squashing flat
Place Inside body in the outside of body and adjust stuffing so the edges can meet when a little
pressure is applied to the inside part.
Crochet edge of outside to the edge of inside, note that the outside has 4 more sc than the inside
so you need to sc2 from outside to 1sc on the inside, 4 times evenly around the edge.
Add any embroidery once the egg cosy has been made up being careful that you do not stitch
through both layers of the body. Secure and hide the ends of the yarn by tying a knot at the end
of the yarn and pulling it through a gap in the crochet of the top layer so it is hidden between the
outside and inside layers.
Monday, April 13, 2009
Too much...
Just too much going on the past few weeks...too much to get caught up with since vacation, too much work, too many errands, too many commitments...
But now, here's something that I've been able to play with, relax with, enjoy...
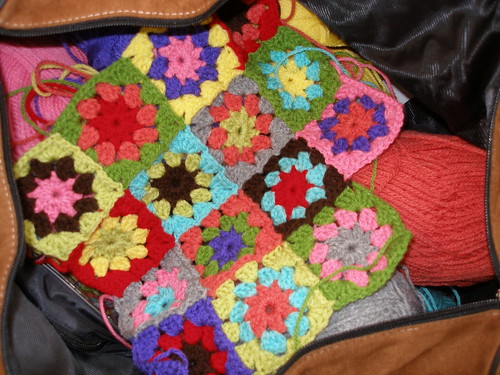
I love being able to pick up these little squares, joining them together with such ease.
I have wanted to try Lucy's method of joining but needed/wanted a more colorful selection of yarn than what I already had on hand (an excuse to go out and buy more yarn), but being my usual impatient self, the only thing I could find/afford at the moment was some inexpensive RedHeart DK/sport weight yarn...and though at the time I thought the colors were rather loud and obnoxious, I am delighted with my project! This is just a small sampling, so I could practice the squares and their joining. Now, as you can see, coming along quite nicely...

Made up of 20 squares, then I crocheted around the rectangle in granny square fashion, a round of each color...pretty colorful isn't it?
Just too much going on the past few weeks...too much to get caught up with since vacation, too much work, too many errands, too many commitments...
But now, here's something that I've been able to play with, relax with, enjoy...
I love being able to pick up these little squares, joining them together with such ease.
I have wanted to try Lucy's method of joining but needed/wanted a more colorful selection of yarn than what I already had on hand (an excuse to go out and buy more yarn), but being my usual impatient self, the only thing I could find/afford at the moment was some inexpensive RedHeart DK/sport weight yarn...and though at the time I thought the colors were rather loud and obnoxious, I am delighted with my project! This is just a small sampling, so I could practice the squares and their joining. Now, as you can see, coming along quite nicely...
Made up of 20 squares, then I crocheted around the rectangle in granny square fashion, a round of each color...pretty colorful isn't it?
Thursday, April 02, 2009
Grrrrrr...can't find my size G hook! It was in the bag with my ripple-stitch-pillow-cover-to-be...and now it's not there. Guess where I'll be off to in the morning...I want to try out Lucy's new tutorial on joining granny squares together as you go. Pretty neat, take a look!
Tuesday, March 31, 2009
Tuesday, March 24, 2009
Pay it Forward...
joined from the Blogging group on Ravelry and I'm doing it just a wee bit different...
So, for my rules, only the first 3 comments participating in the Pay It Forward Giveaway will receive a gift, but they have to be comments on 3 of my currently comment-less posts okay? So look down the list, I just started my blog a bit ago :-)
Recap of the Rules:
1. Be one of the first three to leave a comment to any three comment-less posts, with the link to your Pay It Forward Giveaway post.
2. Be willing to follow through on sending out one prize each to three lucky winners of your contest.
3. Make sure your profile has contact information available.
So that's it then! I'll just wait to see what happens! I love getting comments, I try to respond to all and need the enticement of comments to encourage me to blog.
It's been awhile...I'm in vacation-land and have much to say, but no pics as yet as I'm unable to upload any at present...so I'll wait til we're home. Another week or so, well March 31 we fly home. I'm so anxious to see my little Savannah, she'll be coming to see us Wednesday night! So it's off with my oldest daughter and her boyfriend, and in with the younger daughter and granddaughter. I heard they both got their pedicure yesterday in preparation for the trip, I'll have to remember to take pics of those cute little toes...
So, I'm off to the pool or beach, or both, we'll see. The day looks to be very sunny, low 80's but it's still a bit breezy. Don't know if it's because it's March or if this is unusual. Usually we just have a mild gulf breeze when we're here (April) but this time there has been some real wind...the kind that makes you shiver when you get out of the water. I'll survive...oh yes, it's not a hard life at all!
So, I'm off to the pool or beach, or both, we'll see. The day looks to be very sunny, low 80's but it's still a bit breezy. Don't know if it's because it's March or if this is unusual. Usually we just have a mild gulf breeze when we're here (April) but this time there has been some real wind...the kind that makes you shiver when you get out of the water. I'll survive...oh yes, it's not a hard life at all!
Monday, March 16, 2009
While packing up for the trip, have to take some projects along of course...little of this, little of that. Along with some dishcloths I'm working on a little girls's knitted top, and then there's my ongoing ripple pillow cover, take a peek:
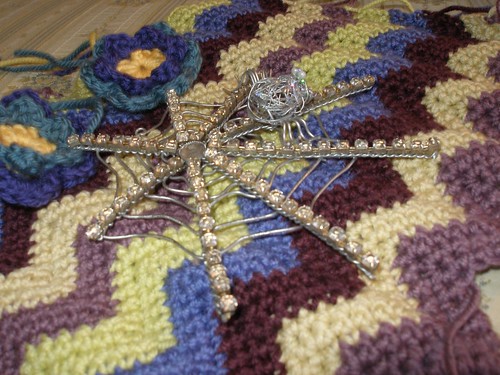
Do you not love my beautiful glitzy spider and web? c'mon, just a bit? She is quite glorious and has been around for quite awhile now. She usually graces the corners of a grouping of pictures on the wall, but I wanted to try and photograph some of her shimmering beauty :-)
I'm also packing up a couple scrapbook kits that I receive on a monthly plan thru Scarlet Lime. Beautiful papers and embellishments, lots of trims and buttony things too. These two kits kinda blended together so I'm using them to make up our Florida vacation album while I'm there, that way I'll come back with a completed book of our trip. Well, that's the plan anyway. Here's a look at the stash...

And so, now I'm off, flight leaves early am, I'm packed and off to bed to try and read myself to sleep for a few hours...nighty-night...
Do you not love my beautiful glitzy spider and web? c'mon, just a bit? She is quite glorious and has been around for quite awhile now. She usually graces the corners of a grouping of pictures on the wall, but I wanted to try and photograph some of her shimmering beauty :-)
I'm also packing up a couple scrapbook kits that I receive on a monthly plan thru Scarlet Lime. Beautiful papers and embellishments, lots of trims and buttony things too. These two kits kinda blended together so I'm using them to make up our Florida vacation album while I'm there, that way I'll come back with a completed book of our trip. Well, that's the plan anyway. Here's a look at the stash...
And so, now I'm off, flight leaves early am, I'm packed and off to bed to try and read myself to sleep for a few hours...nighty-night...
Looking at this basket of colorful cotton makes me long for springtime! I'm making great progress on dishcloths so pics of those soon I promise. There's a few balls of cotton making their way with me on vacation so I should return with a handful of new cloths. Til then, just the lovely colors to look at...

Saturday, March 14, 2009


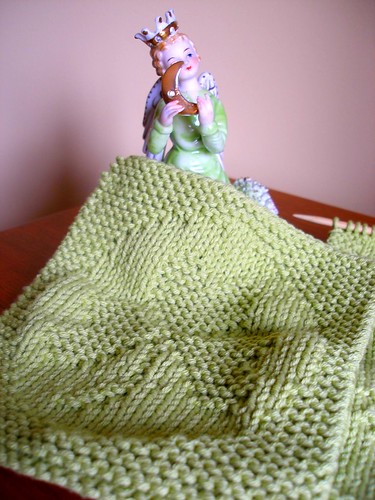
Couple of things for today...I finished the larger of the St. Paddy Day dishcloths, it's not blocked yet, but I love it!

The lovely turquoise project at the top is one of Kristen's patterns from her new pattern set "Spring Cloths"...I'm doing the umbrella first and it's almost done! And I suppose you've noticed the little figurine?
Now, do you not think this is the cutest little cow/steer? I'm not a cattle expert, but figure with the darling gold horns, must be a steer? Look down here for a better view...
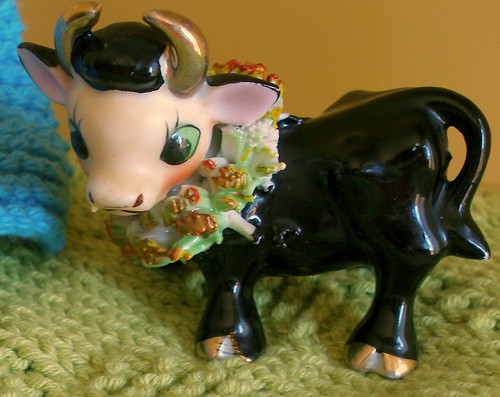
oh my, just too sweet isn't it?
The lovely turquoise project at the top is one of Kristen's patterns from her new pattern set "Spring Cloths"...I'm doing the umbrella first and it's almost done! And I suppose you've noticed the little figurine?
Now, do you not think this is the cutest little cow/steer? I'm not a cattle expert, but figure with the darling gold horns, must be a steer? Look down here for a better view...
oh my, just too sweet isn't it?
Friday, March 13, 2009
I'd like to share a little ballerina I purchased recently on Etsy...she's set atop a pincushion, made by BethsBagz, and I just adore her!

Isn't she the cutest??? Makes me smile everytime I look at her. Whimsical, yep, that's what she is.
*Beth listed some of her pincushions on Ebay today, hurry, go take a peek!
Isn't she the cutest??? Makes me smile everytime I look at her. Whimsical, yep, that's what she is.
*Beth listed some of her pincushions on Ebay today, hurry, go take a peek!
Thursday, March 12, 2009
Will you think I'm crazy if I tell you I just got back from seeing "Twilight"??? I had to... last chance for me to see it at the theater. I know it comes out on DVD in a week or two, but I really wanted to see it on the "big screen". I totally enjoyed it. The first part was a little cheesy, but by the time Edward took Bella to meet his family I was hooked...and then I couldn't believe when it was over... I will be anxiously awaiting New Moon. Anyone else like Twilight?
Well, to start with, I'm trying, striving to achieve a good amount of organization for 2009. We'll see how far I get, but I have made progress.
Knitting lures me away from a lot of my routine tasks but I have started cracking down and trying to do the routine first, then reward myself with knitting or crafting time.
And another thing...I get so far off track that I seldom post my finished items on Ravelry...well, that has to change...so I've just posted a small dishcloth that I did, it's for St. Paddy's Day, a shamrock of course, and I'm just a wee bit away from finishing the larger cloth! These two cloths were posted as a freebie by the very talented Kris from KrisKnits. And here is my smaller one:
ahhhh...isn't it just so cute??? Can't wait to finish up the large cloth tonite...just a few rows to go!
I'm anxiously awaiting Kris' Springtime Cloth collection, and I'll be starting those pronto!
Oh, by the way, there's a link to KrisKnits on the sidebar...be sure to look at all her luscious cloth collections she has for sale on the right hand side of her page....yummmmmmm!!!
Subscribe to:
Posts (Atom)